How to Crochet a Sphere
How to Crochet and Adapt a Sphere for Perfect Amigurumi
Contents
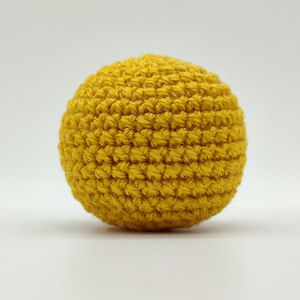
Crocheting a sphere may seem like a simple task, but mastering this fundamental shape is crucial for creating adorable amigurumi characters. The versatility of spheres in amigurumi lies in their ability to serve as the foundation for various shapes, such as ellipsoids (elongated spheres) and egg shapes. In this blog post, I'll guide you through the process of crocheting a perfect sphere, explain its significance in amigurumi, show you how to adapt it for more complex shapes, and explain the maths behind it.
Why Crochet Spheres for Amigurumi?
Amigurumi, the art of crocheting small stuffed toys, relies heavily on basic shapes like spheres. A perfectly crocheted sphere forms the body of many amigurumi characters, providing a balanced and aesthetically pleasing foundation. Spheres are not only easy to make but also serve as a great starting point for beginners in the world of amigurumi.
Materials Needed
Before diving into the crochet process, gather the following materials:
Yarn of your choice
Crochet hook suitable for your yarn weight - remember to go down a hook size or two from that recommended on the yarn's label
Fiberfill or stuffing material
Yarn needle
Stitch marker - if you do not have a dedicated stitch marker, a small piece of yarn in a contrasting colour can be used.
Crocheting the Sphere
To crochet a sphere, follow these fundamental steps outlined below (a detailed pattern is available later on this page):
Begin with a magic ring and crochet a specific number of single stitches into the ring, depending on your pattern (commonly starting with 6 single crochets).
Place a stitch marker at the beginning of each round and move it up as you start the next round.
Work continuously in rounds, adding stitches evenly to form a flat circle. If starting with 6 single crochets, this involves adding 6 more single crochets in each round. For a smooth sphere, ensure that you stagger your increases – refer to my post on creating a perfect circle for more details.
Crochet several rounds without increasing, matching the number of rounds used to create the flat circle and adding one more. For instance, if you initiated with 6 single crochets and worked 5 rounds (adding 6 stitches in each round to reach 30 single crochets), continue with 5+1=6 rounds of 30 single crochets.
Gradually decrease the number of stitches in each round (reversing step 3) to close the sphere.
Pattern
Here's a list of the abbreviations used in the patterns below:
sc: single crochet (US terminology - this is equivalent to a UK double crochet)
inc: increase (referring to working two single crochets into the same stitch)
dec: decrease (referring to single crocheting two stitches together)
The provided pattern illustrates a small sphere initiated with 6 single crochets. Adjust the size by either adding or removing rounds, as explained earlier.
Increase Rounds
Round 1: Begin with a magic ring and crochet 6 single crochet stitches into the ring. Pull the ring tight. (6sc)
Round 2: [inc] x6 (12sc)
Round 3: [sc, inc] x6 (18sc)
Round 4: [sc, inc, sc] x6 (24sc)
Continue increasing the number of stitches in each round by adding 6 stitches evenly until you achieve the desired diameter for your sphere.
Constant Rounds
Rounds 5-9: (5 rounds or match the number of increase rounds and add 1) sc around (24sc in each round)
Decrease Rounds
Before decreasing, fill the sphere with fibrefill or stuffing material to achieve a plump and firm shape. Continue stuffing as you go.
Start decreasing the number of stitches in each round to form the sphere. This is a reverse of the increase rounds:
Round 10: [sc, dec, sc] x 6 (18sc)
Round 11: [sc, dec] x 6 (12sc)
Round 11: [dec] x6 (6sc)
Finishing
Cut the yarn, leaving a long tail. Thread the tail through a yarn needle, and weave it through the front loop of each remaining stitch. Pull tight to close the opening. Weave in any remaining ends.
Tips
Consistent tension is key to achieving a smooth and even sphere.
Tight stitches help to prevent stuffing from poking through.
Use a stitch marker to keep track of the beginning of each round.
Now that you've mastered the basic sphere, you're ready to explore the exciting world of amigurumi and adapt this pattern to create a variety of adorable characters!
Adapting to Ellipsoids
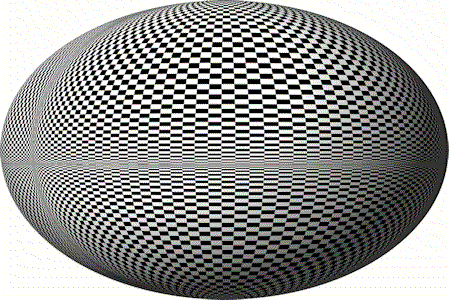
An ellipsoid is like a stretched or squished sphere with uneven lengths. It's a shape found in things like planets, and Earth itself is a type of ellipsoid. By incorporating ellipsoids in amigurumi, you can easily shape the bodies of your characters to mimic different postures, sizes, and features. The elongated and compressed forms of ellipsoids offer the flexibility to design animals, creatures, or even human-like figures with unique proportions. This versatility adds a dynamic and lifelike dimension to the final amigurumi creations.
To create an elongated sphere, simply add in extra constant rounds before starting decreases. This shape can be useful for the body of different animal shapes - it will elongate the shape vertically while maintaining a rounded appearance. Alternatively, create a squashed sphere by removing some of the constant rounds. Experiment with the length to achieve the desired proportions for your amigurumi character.
My Eggies are based on an elongated sphere, as are the bodies and even the arms and legs of many of my dolls.

Creating Egg Shapes
Egg shapes are essentially elongated spheres with one end tapering to a point. To achieve this:
Follow the steps for creating an elongated sphere.
Gradually decrease the number of stitches in each round during the decrease rounds. For example, rather than decreasing by 6 stitches on each round, only decrease by 3 stitches. This will require more rounds of decreasing and will create a more pointed tip.
Experiment with the length and rate of increases/decreases to customise the shape.
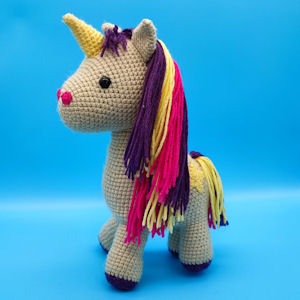
Egg shapes prove beneficial when crafting the heads of animals with pointed noses, like horses, or for the bodies of human-like dolls, creating a desirable inward taper towards the shoulders.
The (Simple) Maths Behind a Crochet Sphere
For those intrigued by the mathematics, read on. If not, happy crocheting!
Now, let's demystify why the pattern above shapes a sphere. During this process, we'll make a few assumptions to make it simpler:
A single crochet forms a square stitch, equal in height and width.
The number of stitches across (the diameter) is always double the number of rounds, as each round provides one stitch either side of the centre.
The circle's circumference is determined by the number of stitches in the final increase round.
Mathematically, the circumference is pi times the diameter. Simplifying pi to 3, the circumference becomes 3 times the diameter.
For example, with 4 increase rounds as in the pattern above:
The diameter will be 4x2=8
The circumference will be 3x8=24
To achieve 24 stitches in the fourth round, we can start with 6 single crochets and increase by 6 in each round since 24÷4=6
To transform this into a sphere, constant rounds are needed before the final decrease rounds. Imagine looking at the sphere from the side and drawing a circle around it. This circle must have the same circumeference as the initial circle to ensure a circular appearance from any perspective. In our example, we require a total of 24 stitches for the circumference and therefore 12 rounds (each round adds a stitch either side of the sphere). The decrease rounds mirror the increase rounds, except that there is one round less. Therefore, we have 4 increase rounds, 4-1=3 decrease rounds, meaning we require 4+1=5 constant rounds to make up the 12 required rounds.
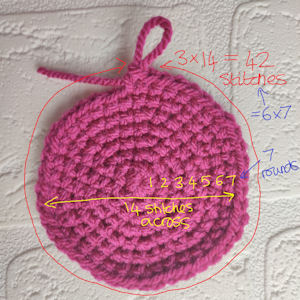
As another example, let's think about a larger sphere with 7 increase rounds:
The diameter will be 7x2=14
The circumference will be 3x14=42
To achieve 42 stitches in the seventh round, we can start with 6 single crochets and increase by 6 in each round since 42÷7=6
To transform this into a sphere, constant rounds are needed before the final decrease rounds. In our example, a total of 42 stitches and therefore 21 rounds are required. We have 7 increase rounds, 7-1=6 decrease rounds, meaning we require 7+1=8 constant rounds.
This all works for a sphere of any size. let's look at a general sphere for any number of rounds, we will call the number of increase rounds r.
The diameter will be 2xr=2r stitches
The circumference must therefore be 3x2r=6r stitches. This can be achieved by starting with 6 single crochets, and increasing by 6 on each round.
The total number of rounds must therefore be 6r/2=3r rounds. The increase has r rounds, the decrease has r-1 rounds, so the constant must have r+1 rounds.
Mastering the art of crocheting spheres opens up a world of possibilities for amigurumi enthusiasts. These basic shapes serve as the building blocks for a variety of characters, from cute animals to whimsical creatures. By understanding how to adapt spheres into elongated shapes and eggs, you can unleash your creativity and bring unique characters to life. So, grab your crochet hook and yarn, and embark on an amigurumi adventure filled with endless possibilities!